Sweet Flower Buns — The Ultimate Guide
The Story Behind Sweet Flower Buns: A Rich Cultural Heritage
To truly appreciate Sweet Flower Buns, it helps to understand where they come from and what they represent. In Chinese culinary tradition, shaped steamed and baked buns have been a staple for thousands of years. The art of manipulating dough into beautiful forms — animals, flowers, fruits, and mythological figures — reflects a deep cultural belief that food is not merely sustenance but also art, celebration, and an expression of care for the people you are feeding.
Traditionally, flower-shaped buns were associated with festivals, family gatherings, and ceremonial occasions. Gifting beautifully shaped buns was — and remains — a meaningful gesture, symbolising prosperity, beauty, and the wish for a flourishing life. In northern China in particular, steamed flower rolls (Hua Juan) are still a common sight at New Year celebrations and weddings, their soft petals unfurling as a symbol of new beginnings.
The baked version — glossy and golden rather than pale and steamed — became popular as baking ovens became more common in home kitchens, blending traditional dough-shaping techniques with Western baking methods. Today, you will find beautiful flower bun variations in bakeries from Taipei to Tokyo, from Seoul to Singapore.
Understanding the Ingredients: What Makes These Buns Special

All the ingredients you need, laid out and ready — each one plays a specific, important role.
Great baking always starts with understanding your ingredients. Every element in a Sweet Flower Bun recipe plays a specific, important role, and knowing why each ingredient is there will help you troubleshoot problems, make smart substitutions, and ultimately produce a superior result.
Bread Flour vs. All-Purpose Flour
The choice of flour has a profound impact on the final texture of your buns. Bread flour (12–14% protein) develops more gluten when kneaded, resulting in a chewier, more elastic dough. All-purpose flour (9–11% protein) produces a softer, more tender crumb. Many Asian bakeries blend the two — and for home bakers, this combination is the sweet spot between structure and tenderness.
Yeast: The Engine of Lift
Instant dry yeast is the most convenient option for home bakers. It can be mixed directly into the dry ingredients without proofing. Always check that your yeast is fresh — old or dead yeast will result in a flat, dense dough that never achieves the airy lightness these buns are known for.
Milk, Butter, and Eggs: The Enriching Trio
These three ingredients are what separate a simple bread roll from a genuinely luxurious Sweet Flower Bun. Milk adds tenderness and dairy richness. Butter, incorporated after initial mixing, enriches the dough and produces a beautifully soft, golden crumb. Eggs add structure, richness, and a gorgeous golden colour — and the egg wash applied before baking gives flower buns their signature glossy finish.
Sugar and Salt: The Balancing Act
Sugar feeds the yeast, helps browning, and contributes to that soft, cake-like crumb. Salt controls fermentation rate, strengthens gluten structure, and crucially enhances flavour. Never let salt and yeast come into direct contact before mixing — salt can kill yeast on contact.
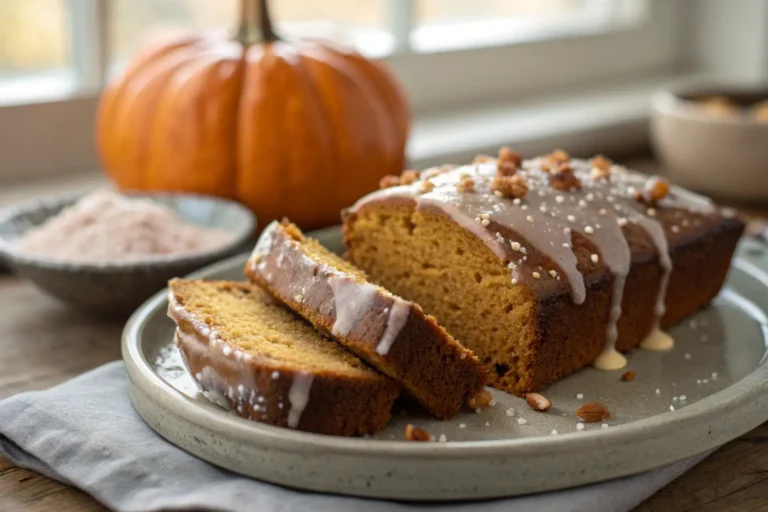
The Complete Sweet Flower Buns Recipe
Sweet Flower Buns
Ingredients
Instructions
-
1
Combine the Dough Base
Whisk both flours, yeast, sugar, and salt in a large bowl. Make a well in the centre, add the egg and warmed milk, and mix until a shaggy dough forms. Turn out onto a lightly floured surface.
-
2
Knead to Develop Gluten
Knead for 8 minutes until smooth, then add softened butter cube by cube. Continue kneading 7–10 minutes until the dough passes the windowpane test — you can stretch a piece until light shows through without tearing.
-
3
First Rise (1–1.5 hours)
Place dough in a lightly oiled bowl, cover, and let rise in a warm spot until doubled in size. This slow rise develops the complex flavour and airy texture.
-
4
Shape the Flower Buns
Punch down the dough and divide into 12 equal portions. Roll each into a thin oval, spread the filling, roll into a log, cut lengthways leaving one end attached, twist the two halves together, and curl into a flower circle. Place on parchment-lined trays.
-
5
Second Rise + Egg Wash (30–45 min)
Cover loosely and let puff. Preheat oven to 180°C (350°F). Beat remaining egg with a tablespoon of milk. Brush each bun gently and sprinkle with sesame seeds or pearl sugar.
-
6
Bake to Golden Perfection
Bake 15–18 minutes until deep golden brown. Cool on the tray for 5 minutes, then transfer to a wire rack. Best served warm when the filling is still slightly molten.

The shaping process — twisting and curling the dough into a beautiful flower form is easier than it looks.

Kneading is the single most important step — take your time and enjoy the process.
Professional Tips for Bakery-Quality Results
Even experienced bakers encounter setbacks when trying a new recipe for the first time. Here are the most important tips from professional bakers and seasoned home cooks to help you avoid the most common pitfalls.
🌡️ Temperature is Everything
Milk that is too hot (above 43°C) will kill the yeast. Milk too cold leaves yeast sluggish. Use a thermometer and aim for 35–38°C precisely.
⏳ Never Skip the Second Rise
Baking under-proofed buns produces dense, doughy results. If short on time, refrigerate shaped buns overnight and bake the next morning.
⚖️ Use a Kitchen Scale
A cup of flour can weigh 120–170 g depending on scooping. Weighing ingredients is the single easiest way to guarantee consistent results every time.
🖌️ Master the Egg Wash
Apply in one smooth stroke. Avoid letting it pool in crevices — this prevents proper rise in those spots and causes uneven colouring.
🔄 Rotate Your Tray
Most home ovens have hot spots. Rotate the baking tray 180° halfway through baking for even golden browning across all buns.
🪟 The Windowpane Test
Stretch a small piece of dough until light shows through without tearing. This is your signal that gluten is properly developed and the dough is ready to rest.
Filling Variations: Endless Creative Possibilities

The same dough, four completely different experiences — each filling transforms these buns entirely.
One of the greatest joys of Sweet Flower Buns is how wonderfully adaptable they are. The basic dough recipe remains the same, but the filling can transform these buns completely. Here are five beloved variations to inspire your creativity.
Storing and Serving Your Sweet Flower Buns
Fresh from the oven — serve them warm for the ultimate experience.
Sweet Flower Buns are, without question, at their absolute best the day they are made. Warm from the oven, with their soft crumb and fragrant filling, they are practically irresistible. However, proper storage can keep them tasting fresh and delicious for several days.
Once fully cooled, store leftover buns in an airtight container at room temperature for up to 2 days. For longer storage, wrap each bun individually in plastic wrap and place in a zip-lock freezer bag. They will keep in the freezer for up to 2 months.
To reheat, place frozen buns in a preheated oven at 160°C (320°F) for 10–12 minutes, or microwave individual buns for 20–30 seconds wrapped in a slightly damp paper towel.
“Sweet Flower Buns make a beautiful centrepiece at a brunch table, a welcome addition to a bake sale or gift box, and a genuinely impressive treat to bring to friends or family gatherings.”
Troubleshooting: Common Problems and How to Fix Them
Even the most careful bakers occasionally run into problems. Here is a guide to the most common issues you might encounter, along with clear solutions.
This is almost always a yeast problem. The yeast was old, or the milk was too hot and killed it. Proof your yeast separately first — dissolve it in warm milk with a pinch of sugar and wait 5–10 minutes. If it foams, it is alive. If nothing happens, replace the yeast.
This usually indicates under-proofed dough or over-kneading. Make sure to give the dough adequate time during both rises, and verify the windowpane test before resting.
The buns were likely over-proofed, or the filling was too liquid and softened the layers. Reduce the second proofing time slightly and ensure your filling is thick enough to hold its shape.
Your oven runs hot at the bottom. Move the tray to a higher shelf, or place an empty baking tray on the shelf below as a heat shield. Reduce temperature by 10°C and extend baking time slightly.
Resist adding a lot of flour. Sticky dough often needs more kneading, or the kitchen is too warm. Lightly flour your hands and surface. If necessary, refrigerate the dough for 20 minutes before shaping.